
An Amateur Unicorn’s Guide to DIY Brightly Colored Hair
Hello friends! You may have noticed that my hair changes color on a pretty regular basis. I thought it was high time for me to tell you why and how.

Various Hair Colors I’ve had over the last year. The green and yellow hair was done by a professional hair stylist (Ruby Devine at the LABoratory in Alexandria, Virginia), I did all the other colors.
I do not remember what all these colors are named, but I could probably make an educated guess if y’all reallllyyy wanted to know?
I"m kind of a restless person (Yay ADHD!) so ever since I graduated high school and left home, I've been pretty adventurous with my hair. I rarely have kept the same hairstyle or hair color for more than a year, really. My natural hair shade is a dark blonde, of which I'm not a huge fan, so I've messed with it for years. Here's one of the last pictures of me with completely natural hair (and honestly even then, I may have had some highlights in there, I think I had some put in like, in September 2005, and this picture is from my high school graduation in May 2006, so they may have still been hanging around).
I also really love bright colors and sparkly things, so I've honestly been moving toward having rainbow hair for a pretty long time now. However, my sensible side won out for many years; I didn't want to job opportunities because of my hair. So I changed my hair up often, but I kept it all in generally "natural" colors. When I went to law school and became an attorney, I really resigned myself to never having the unicorn hair I wanted (the legal profession is generally pretty conservative when it comes to appearances). But fortunately, my current job as a trademark examining attorney at the US Patent and Trademark Office doesn't care what color my hair is! I didn't want to mess with my hair color too much before my wedding in June 2018, as I did want my hair to look vaguely natural for that, so I held off for my first year and a half at the USPTO, but since then, I've really had fun letting loose and coloring my hair all sorts of different colors.
If you want to see a whole Pinterest board full of ALL the different hair cuts and colors I've had since I was 18, there's one over here.
I love saving money and DIY projects, so I've basically turned my own head into an ever changing art installation. Since June 2018, I've only had my hair professionally cut once (to add bangs) and professionally colored once (after a tire blowout totaled my car, I decided to treat myself). Generally, I cut, bleach, and dye my own hair (I'll do a future blog post on how I cut my hair at some point).

I do not remember what all these colors are named, but I could probably make an educated guess if y’all reallllyyy wanted to know?
Your average fashion color do at a hair salon can easily run you $200-300; you're paying for your stylists' experience and skill. If you want multiple colors in your hair or some sort of special effect, go to a salon. They know what they're doing and can really give you amazing results. But if you just want to play around with one overall color or only a few colors applied horizontally, doing it at home works pretty well! I make no claims that my hair looks as good as it would if I went to a salon, but I'm happy with it and I get a lot of compliments, so it's good enough for me. In the future, when I have more money and less debt, I would totally love to go to a salon every few months for unicorn hair, but it's just not in the budget right now.
Disclaimer: I am totally untrained and definitely an amateur, but I've read a LOT of advice and blog posts to prepare, and have learned a few tricks myself along the way. There's an extent to which bleach will always damage your hair, just as any chemical processing will, but you can take a lot of actions to reduce its impact and keep your hair healthy.
My hair is naturally a dark blonde, with fine texture, but is also fairly thick. Aside from my hair coloring habits, my hair is actually pretty easy to maintain, as it is wavy and dries nicely without any heat styling. If you have pickier hair, you may need to adjust these suggestions to fit your needs.
I'm also writing this blog post from the standpoint of someone who's had hair that's 90-100% bleached over the last year and a half and just bleaches her roots each time, so my photos will reflect that, naturally. I'm also totally an amateur and don't claim to know anything about how these products work chemically, this is really just a how-to guide.
Supplies:
Bleach Powder
Hair Developer (Volume 10-30)
Fashion Hair Color (these are generally semi-permanent. In these photos, I used Arctic Fox’s Wrath)
White Conditioner
Tint brushes (I use two, one for bleach, one for color)
Hair Color mixing bowls (Ditto - one for bleach, one for color)
Vinyl gloves
Mirrors (I use a bathroom mirror and a standing mirror behind me)
Hair clips (optional - some people swear by these, but I've tried using them to section my hair several times and it just never seems to help me at all)
A coloring cape (optional- an old towel or t-shirt is also fine)
Some sort of stopwatch to keep track of time (I use my phone)
Old or stained towels (preferably one for covering any bath mats and another for wiping stray color off your face)Vaseline
Black shirt (optional, but very helpful)
Towel cap (optional, but so nice - really, you just need something to cover your hair while it's marinating. A bathcap works too!)
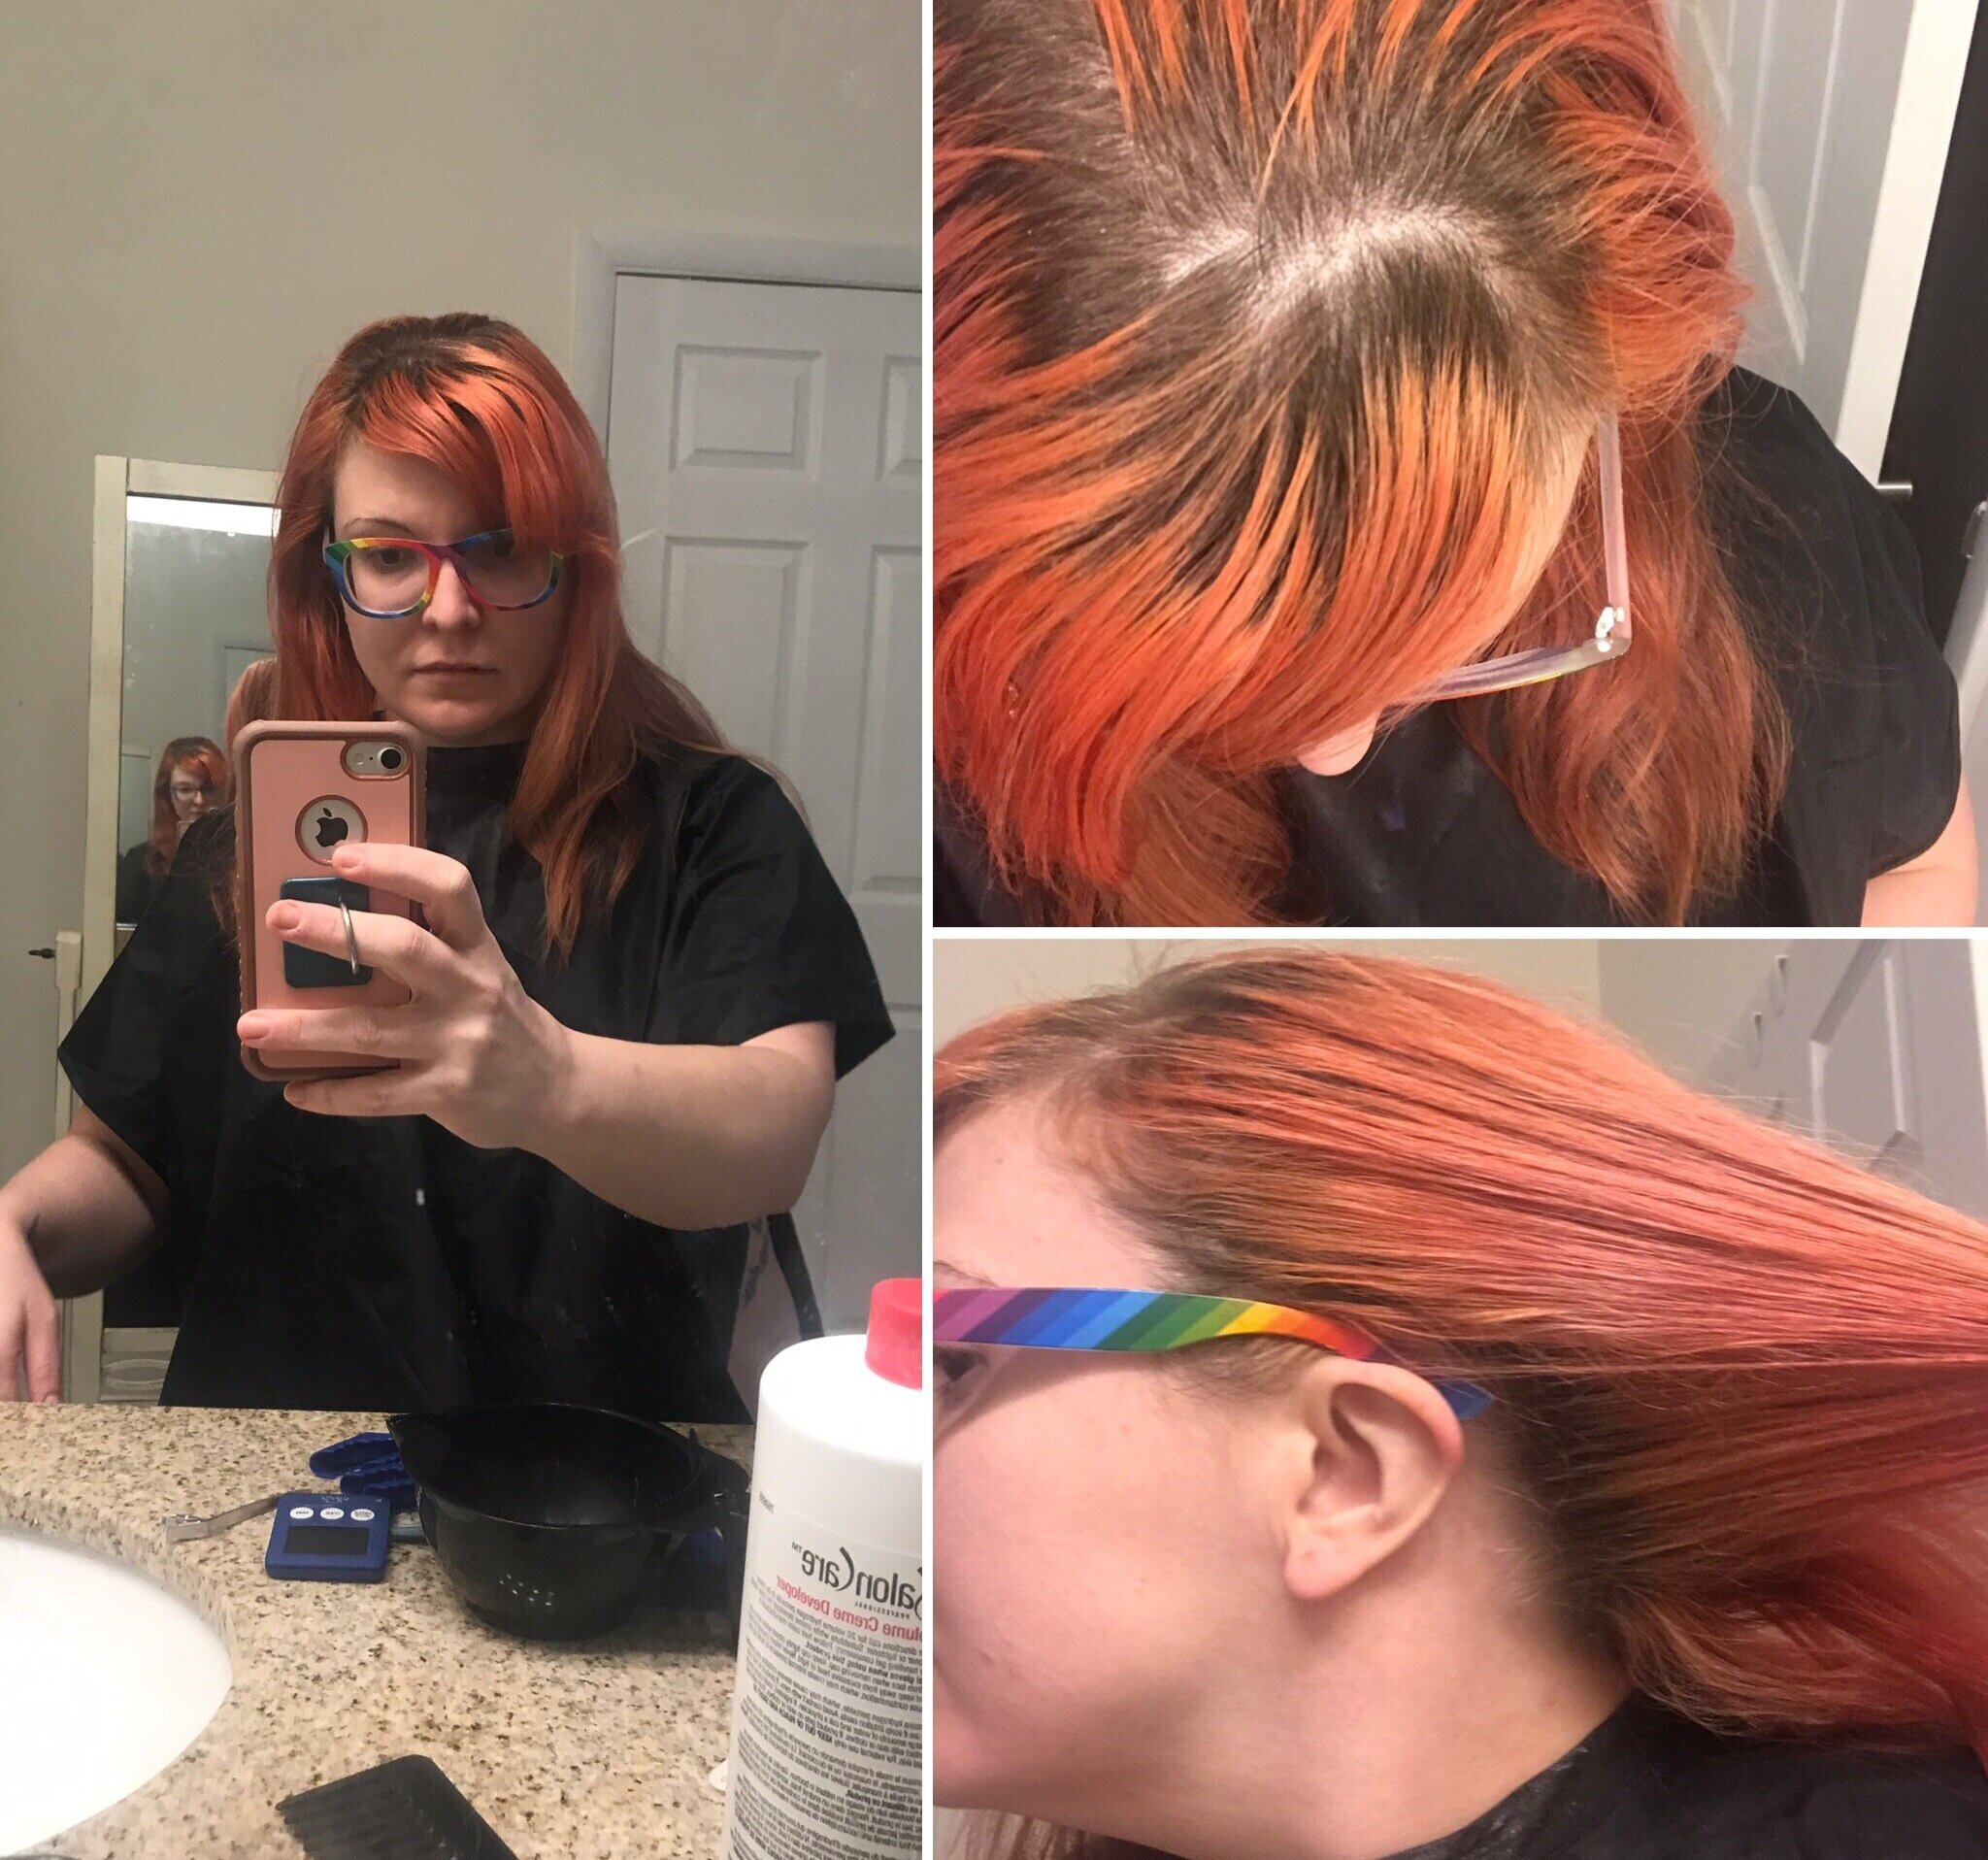
My roots before I bleached them. Yeah, they got super long. I don’t entirely remember which brands I used for the orange, but I know Ion at Home’s Sunrise Orange was the main one; I last dyed my hair orange in mid-October. I did apply Ion’s garnet to my head as well (at the beginning of november) but thought it came out too red-orange, so I let it fade before trying again with a red.
1. Preparing Your Hair: Before you touch your hair with bleach, spend around a week really pampering it; use lots of deep conditioning treatments and avoid heat styling to ensure that it's as healthy as possible before you mess with bleach. I tend to buy sulfate-free shampoo to protect my color and hair, but I've never noticed much of a difference between expensive and cheap conditioners and conditioning treatments, so I tend to pick up whatever's cheapest.
Plenty of people swear by using coconut oil as a deep conditioning treatment. I've tried it before but it doesn't work very well for me. Although I have a lot of hair, my individual stands are pretty thin and fine, so they don't seem to tolerate coconut oil too well; it ends up kind of turning my head into a greasy mess and it's really hard for me to wash out completely. But if your hair isn't as fine as mine, it may be a good idea for you!
If you already have other fashion color in your hair, like I did, it's a good idea to fade it out as much as you can before you add another color. There are many different ways of doing this; a lot of people swear by using dish soap or making a concoction out of crushed up aspirin and water and leaving it on your hair for a while. I personally prefer to just use slightly harsher methods of washing my hair. When I'm actively trying to fade it, I wash my hair more often, use a clarifying shampoo, and use hot water (fashion colors fade so fast that generally, you'll want to wash your hair as little as possible with the coldest water you can stand, to make it last).
2. Purchasing Supplies: Buy your bleaching and hair color products. I highly suggest getting these from a professional beauty product store like Sally's Beauty, as you can tailor your product choices to your own hair. You /could/ use a boxed bleach kit (like Beyond the Zone Radical Bleach Kit), but honestly, I prefer to have a little more control over my ingredients.
Bleach powder comes in either a little packet or a tub (which is cheaper, per volume); some bleach powders include ingredients that are supposed to reduce brassiness, but if you're not going for a pastel color from the start, I don't think that really matters (it certainly hasn't for me). I've tried bleach powders both with and without these toning ingredients and haven't really noticed a difference.
You'll need to add developer to the bleach powder. Developer comes in a few different volume levels: 10, 20, 30, and 40. I personally use Volume 20 on my dark blonde hair to lighten it up to a pale yellow. If you have darker hair then mind, Volume 30 would probably be the way to go; everything I've read online indicates that you really shouldn't use Volume 40 at home unless you're a trained professional, as you could give your skin or your hair a chemical burn.

Some of the various products I used for the coloring in these photos.
You'll also need a hair color! I've had good experiences with Ion at Home (although watch out for their blues, they NEVER wash out), Punky Color, and Arctic Fox. Manic Panic colors tend to look really good but fade super quickly and bleed a lot. I also sometimes pick up Beyond the Zone Color Jams because they're cheap, but I haven't been terribly impressed with them (some of their color descriptions are just weird? Their plum-ilicious looks more like a magenta to me); I tend to use them more to refresh hair color than as an initial dye.
I should note that I haven't done pastel colors in the past and am leery of trying them in the future, for a few reasons. First, you're going to have to use a higher volume developer to get the really white hair you need for pastel colors to really pop. Second, fashion colors are generally semi-permanent and wash out pretty easily and quickly. Pastel colors are going to wash out so quickly that I personally don't think it's worth it unless you go in knowing you have enough money and/or time to touch up your hair regularly and/or use a pastel color depositing conditioner like Overtone (which is great, but not cheap).
You definitely need some sort of white conditioner. I mix this in with my hair color and also use it after the whole process is done to help my hair recover.
I suggest having at least one hair color mixing bowl if you can afford it; they do tend to be pretty cheap, and although you could totally just use a plastic bowl instead, mixing bowls have a nice handle and teeth on the edge to remove excess color from your tint brush. I personally use one mixing bowl for bleaching and another for coloring. That way, you don't have to worry about leftover bleach sticking around in a bowl and messing up your shade.
A tint brush is pretty necessary; I guess you could theoretically color your hair entirely with your hands, but it would be really easy to miss spots. Again, I use one for bleaching and then another for coloring.
Finally, you really need gloves of some type, or your hands are going to be blue/green/orange/whatever for a few days (Learn from my mistakes, y'all). I have a pair of reusable dish gloves somewhere that I've used before, but those are pretty loose, so now I tend to use tight vinyl gloves; I purchased a big box of them at Home Depot. I do try to reuse these as much as possible though, to reduce waste.

There’s a bath mat under this old towel that I’ve already marked with bleach once.
3. Prepping the Room and Your Body: Choose the room you'll be working in. You definitely want to be somewhere with a sink, a shower, and mirrors in front of and behind you, so a bathroom is probably best. I suggest bleach and color proofing your room before you start! I cover up my bath mat with an old towel and move any new or nice towels, linens, or clothes into another room.
Next, prep your body! I am a messy and clumsy enough person that I don't trust myself to be wearing any clothes I care about while bleaching or dying my hair. I either wear really old/already stained clothes or I go nude (hey, it worked for Adam and Eve). I wear a hair cape at this point, as it catches a lot of the mess, but you can also use an old towel or a t-shirt if you prefer.
I prefer to set out all the products and supplies I'm using before hand. This both puts everything exactly where I need it and serves as a checklist to make sure I actually have everything. It would be pretty terrible to be halfway through the process and only then realize you're missing some specific item!
You really need a mirror in front of you and behind you to achieve good results. I use a bathroom mirror and place a standing mirror behind me at a slight angle, so I can look in the standing mirror and see the back of my head in the bathroom mirror. It's a good idea to set this up so you can move the standing mirror to a different angle as you go to make sure you cover the entire area; so either get a mirror that won't be affected by you touching it with gloves that might have bleach on them (plastic, for example), or have two towels ready to go so you can wrap your hand before you move it.
Finally, before I actually start mixing, I pull on a pair of gloves and apply Vaseline to my face, ears, and neck along the hairline. This will help prevent a lot of color staining. It's a /little/ less important when you're applying bleach, as I'm pretty sure it won't bleach your skin, but it can be drying and irritating, so you might as well keep it as contained as possible.
4. Bleaching: While wearing your gloves, put your bleach powder and developer into a mixing bowl and mix it with your tint brush. I don't bother with measuring it out exactly; my goal is to end up with a sort of thick gravy like texture for the mixture, as I don't want it to be so runny that it will go everywhere.

Bleach Powder and Developer: Ready for their close-ups.
The amount you need to mix together depends entirely on how much hair you have. I have a fair amount, so I try to mix up a lot. Inevitably, it isn't quite enough and I have to mix up more. But honestly, it's easy enough to add more bleach powder and developer and mix it up, that it isn't a huge deal (so relax, you don't have to get things perfect on the first time, promise!).
Right before you start applying bleach, check to see how long your bleach and/or developer bottles say to have the product sit on your head. My bleach said 30-40 minutes. The goal is to get your roots/all of your hair pale yellow; if you reach that color on all the sections you've applied the bleach to before you hit the time on the bottle, it's okay to go wash it off then. I see the 30-40 minutes as more of a ceiling rather than a starting point. Of course, make sure to start a stop watch or timer so you can keep track of how long it's been on your head.
Now it's time to apply the bleach to your head.
I wasn't able to get photographs of this process, but I'll do my best to explain this in as much detail as possible so it all makes sense.
As you can see in these photos, my roots are pretty long and defined here. I've bleached my entire head exactly once and now, I just bleach my roots, which reduces the damage to my hair. My goal is to cover all of that dark blonde with the bleach. I start by covering the visible roots in my part and around my face, paying particular attention to the little strands of hair that tend to fall underneath my glasses and in front of my ears (it's really easy to miss them, so now I try to do them pretty quickly). I then use the tip of my tinting brush to grab a straight line of my hair back (parallel to my part), flip that over, and then cover the roots there. I repeat until all the hair visible from the front is covered with bleach. After that, I turn around and face my standing mirror (which remember, is set at an angle to the bathroom mirror so that i can see the back of my head). I do the same thing to the back of my head, only sectioning horizontally instead of vertically.
If you're bleaching your entire head of hair and don't have defined roots to work with like I do, just try to cover all of your natural color. Definitely cover the hair near your scalp before you move on to the rest of your hair though; bleach makes hair dry and more difficult to move, work with, or detangle, so it's better to go in sections.
(Glasses wearer note: Bleach doesn't seem to affect my glasses at all, but mine are also all plastic. I have no idea what this could do to metal frames. If you have metal frames and are concerned, it might be better to wear contacts if you have that as an option.)

Bleaching your roots results in just super attractive photos, yeah? The timer shows how long it took for me to apply all the bleach + a few minutes to make sure it all processed enough.
Lots of people and most professionals swear by sectioning your hair with hair clips while you bleach and dye it, with the idea that it helps keep it out of the way while you're working and makes the whole process easier. I can definitely see the benefits of doing this if you're putting in different colors, but for one color all over, I just haven't found this necessary or helpful.
Once all your roots/all your hair is covered with bleach, you wait until it all turns a pale yellow. If you have a lot of hair like I do, your roots and hairline (the first area you applied bleach to) will turn yellow a LOT faster than the rest of your hair. This is okay, just keep track of the time so you don't over-process any one section of your hair (as you can see, it took me around 34 minutes to apply all the bleach to my hair, and then I waited for a few minutes to make sure it processed completely, so the pieces exposed the longest were under the 40 minutes decreed on the bottle). If you have a few minutes to spare, this is a good time to wash your gloves, mixing bowl, and tint brush (hint, if you're having trouble removing product from either the teeth of your mixing bowl or the bristles of your tint brush, rubbing the brush against the teeth fixes both problems).
When all the sections of your hair you applied bleach to have turned pale yellow, jump in the shower and wash it all out with water (I've used both cold and hot water for this part and never noticed any difference, so I use hot because it's so much more comfortable). I wear gloves for this to avoid touching the bleach as much as possible. Once my head feels mostly clean, I'll take off my gloves so I can check for any remaining product. Finally, I'll actually use shampoo to wash out any remaining bits of bleach. Then I jump out of the shower and dry my hair off as much as I can with a towel (I use a microfiber towel, which is healthier for the hair).
Your hair is going to feel dry as heck at this point and will tangle really easily, but don't worry, we'll fix that with the next step.
5. Coloring Time: I like to change into an old shirt or a black shirt which color won't show up on before I color (trying to put a shirt on over hair color covered hair is a pretty good way to get color...everywhere).
Then I throw my cape and gloves back on and with my second mixing bowl and brush, I mix together hair color and white conditioner. I probably put in about a 3:1 ratio of color:conditioner. That much conditioner is enough to moisturize my hair but also isn't so much that it's going to dilute the color significantly. I then use the same method to ensure I color all of my hair that I use for the bleaching part, only this time, I'm covering ALL OF THE HAIR, starting with the hairline and the roots. Remember, use the tip of the brush to section off and color all of your hair visible from the front, than turn around and use the mirror to color the back, sectioning off hair with the brush horizontally down. Coloring tends to go a lot quicker than bleaching, as you're adding moisture to your hair instead of taking it out, and your hair is just significantly easier to work with (as you can see in my photo below, it took me a little less than 22 minutes to apply it all).

Arctic Fox’s Wrath + conditioner in a mixing bowl. I don’t remember where I got the towel cap at this point; it was probably like the dollar store or target or something? My rainbow glasses are from Zenni. :) The timer shows how long it took me to apply all the color to my hair.
You really want to saturate your hair with the color/conditioner mix. As you're doing all this, make sure to get out any tangles in your hair with your fingers; it'll be easier once you get a little moisture back into it.
Then, I pile all my hair up on my head and put on my towel cap, making sure to cover all of the colored hair in the front, back, and sides. This allows me to walk around and work in the house without smearing color on all the chairs or furniture.
Most hair color bottles say to leave it on for 30-40 minutes, but I always leave it on a lot longer, at least two to thee hours, sometimes all day if I have the time. As I mentioned earlier, fashion color fades quickly, so you might as well help it as much as you can by laying it on thick in the beginning. For these photos, the color mix was on my hair for about 2.5 hours.
After I'm done marinating, I take a shower (putting the gloves back on again to avoid smurf/bloody/cheeto hands) and use hot water to rinse out as much color as I can. The water likely isn't going to run totally clear with semi-permanent fashion colors, but once there's a significant drop of the /amount of color/, I color in the water, I use shampoo to wash my hair again, and then condition for a little while longer just for added measure.
When I hop out of the shower, I'll dry my hair off as much as I can and put on a black shirt or old shirt underneath, as sometimes the hair color will bleed when it's still wet and you don't want to risk staining.
Warning: Your hair color will definitely look way darker when it’s wet than when it’s dry, so let it fully dry before you decide whether you like or hate it.
Want more than one color? If you want to have a more complex color scheme, with more than one color, I suggest sticking to just painting those colors horizontally across your hair instead of vertically, that way you have a clear line to work with (like on your roots). As you can see in my hair photos at the top, I've done this a few times before with having different color roots or tips. That's pretty manageable. I personally don't feel comfortable messing about with different colors /down my hair/ on different strands; to do it correctly, you have to get into using foils and such to ensure the colors don't mix and turn brown and that's just...too much work and skill for me. If I want to do something like that, I go to a professional at a salon.
And that's pretty much it! Here are a few tips for upkeep though, just real quick (this post is already insanely long).
Upkeep Tips:
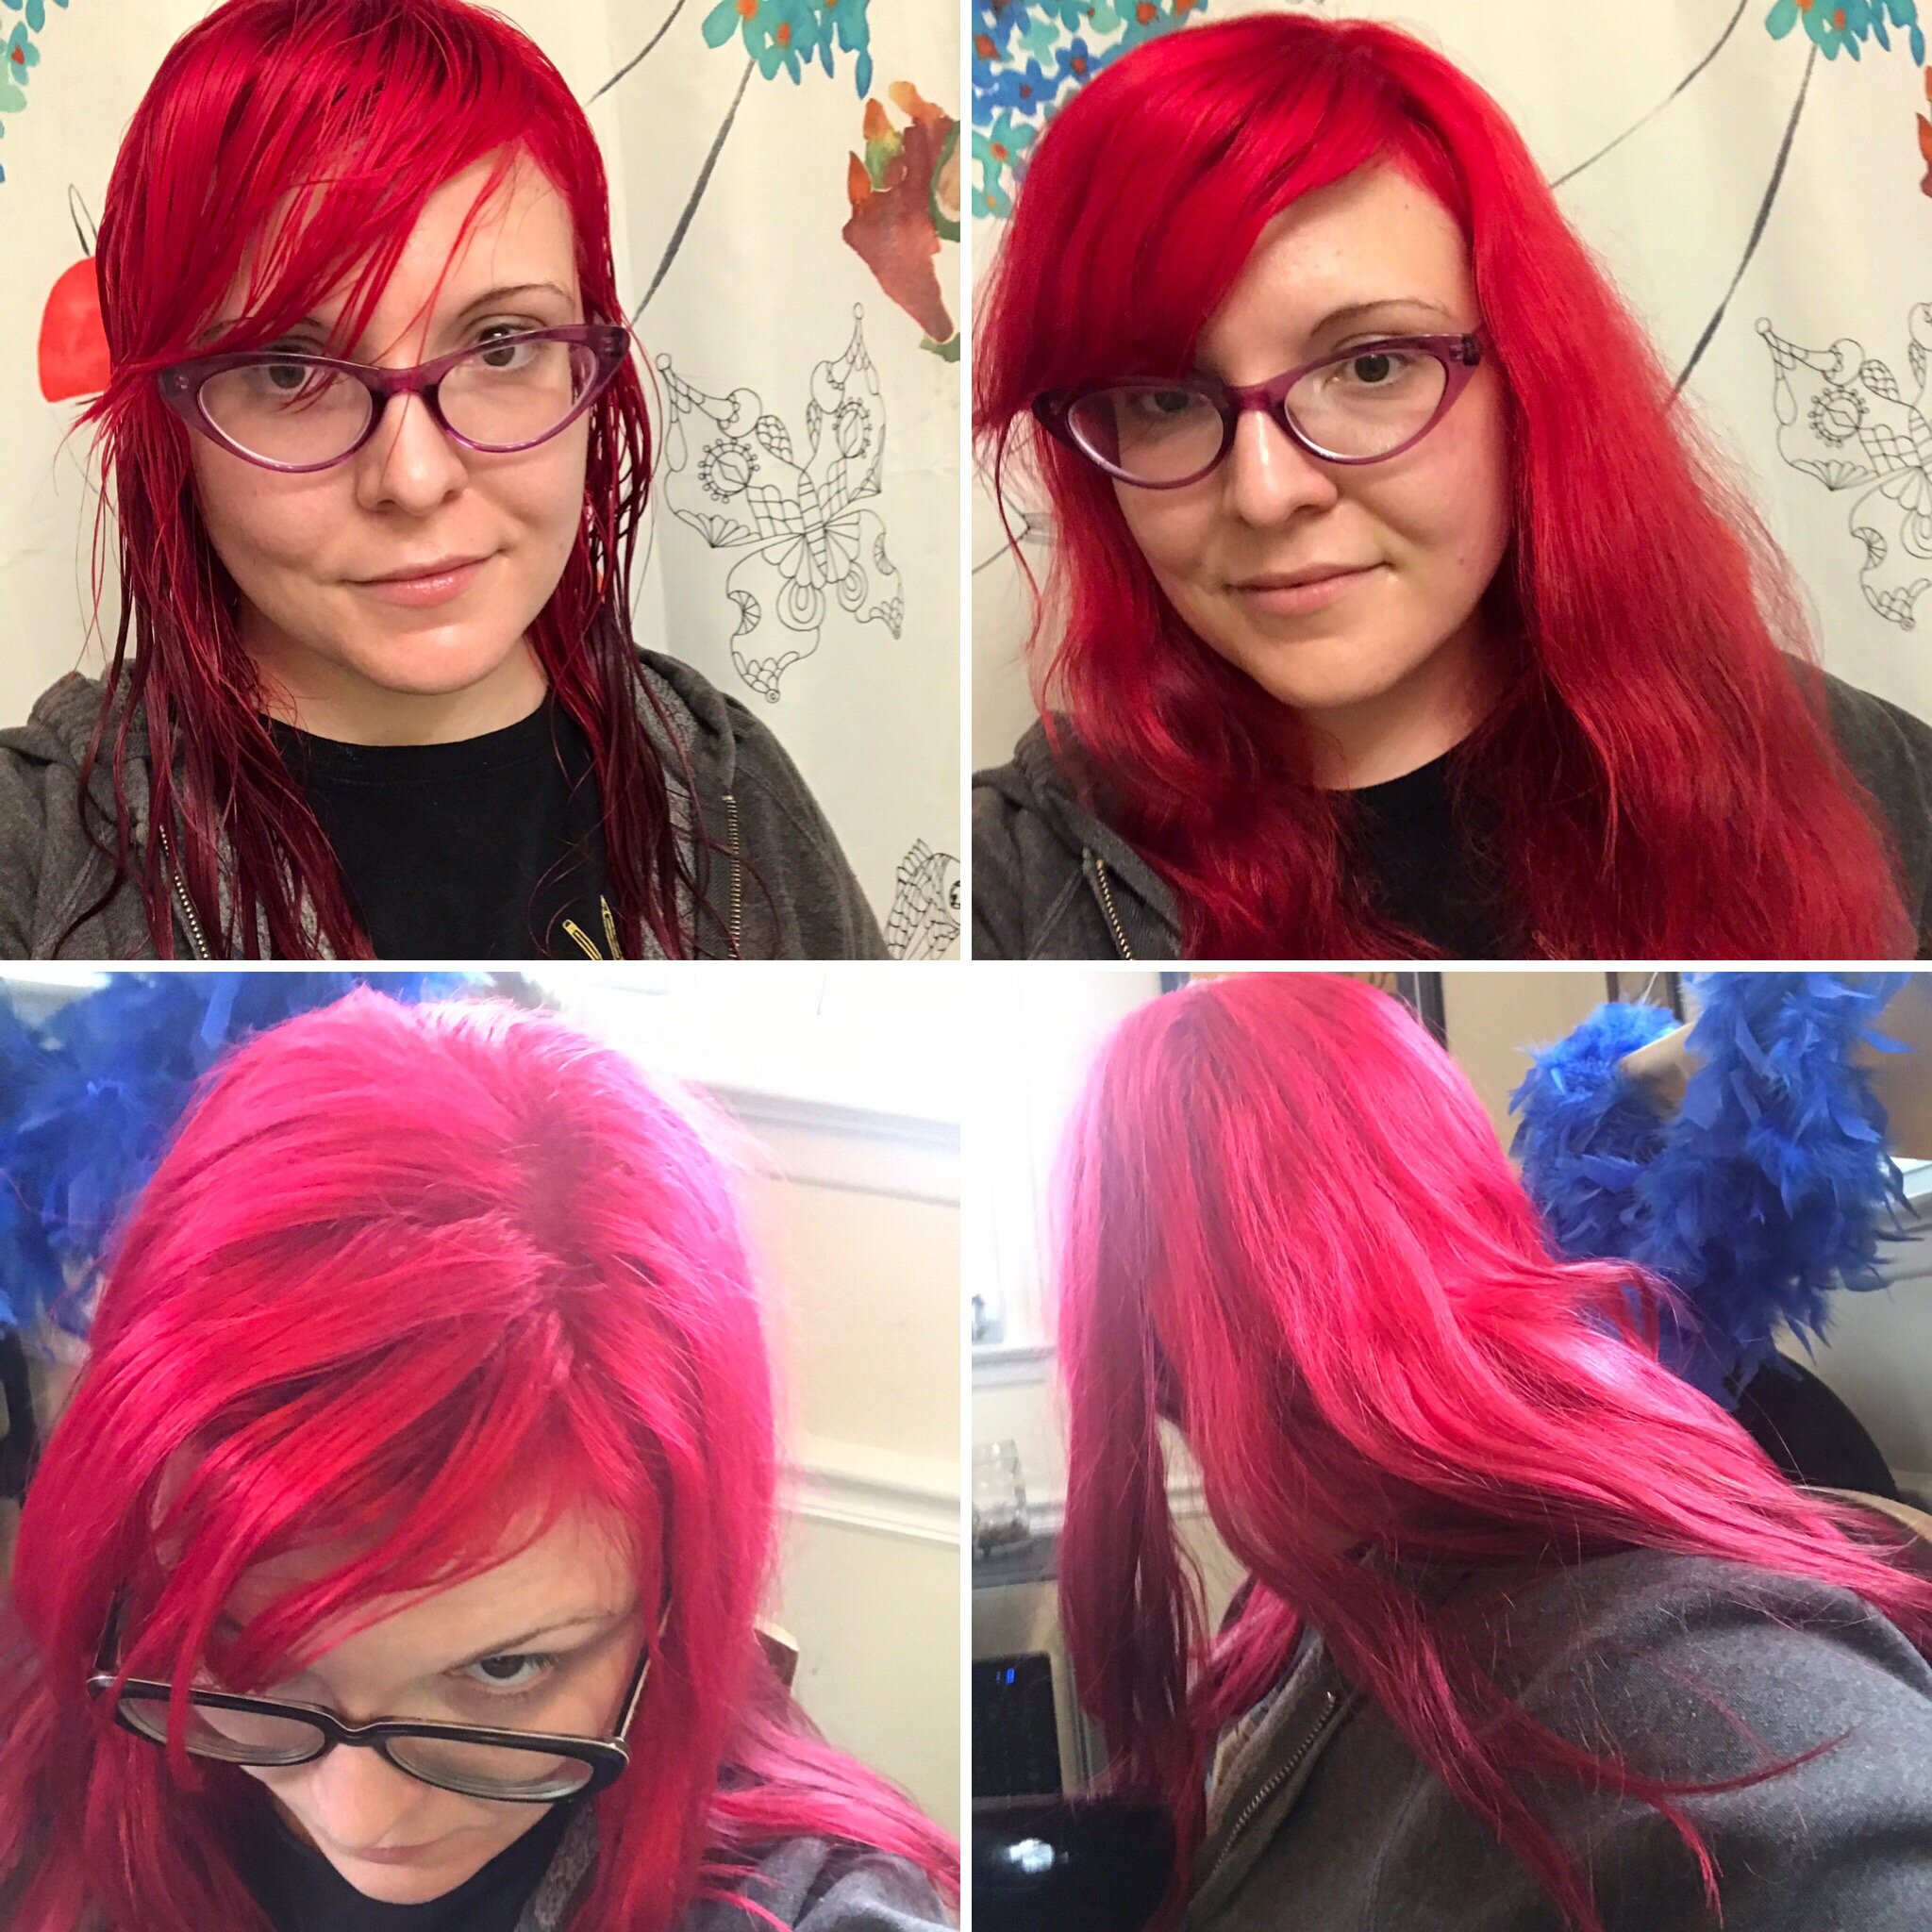
This color is Arctic Fox’s Wrath with wet hair, dry hair, and in two different types of light.
Don't wash your hair every day; I usually wash mine every other day or every two days if I'm not working out as much that week. I'll often use dry shampoo or cornstarch to absorb oils in my hair so I can go longer between washes (cornstarch can be used as a DIY dry shampoo that doesn't require aerosol spray, which can hurt the environment. I put that on my scalp before sleep; as i toss and turn at night, it rubs in and makes my hair look awesome!
Another option is to only wash your hair with water and conditioner; this removes some of the sweat and oil buildup without needing shampoo.
A sulfate-free shampoo is pretty much necessary when you have fashion color. I've used OGX in the past but have started switching now to solid shampoo bars to reduce my environmental impact (yes, I know dying my hair ends up requiring a lot of plastic bottles and plastic products. I'm currently working on researching brand alternatives that are more environmentally friendly).
Try to only wash your hair with cold water if you can stand it, or lukewarm at least. I hate the cold and usually use lukewarm and my hair color still manages to last a pretty long time!
You can refresh your hair with a mixture of hair color and conditioner every few days. There are a few brands of conditioner with hair color already included, like Overtone. In my experience, these work really well but are also pretty expensive (like $18 a bottle versus $7-10 for a tube or jar of hair color + an additional few bucks for some white conditioner, which again, you can just buy at the dollar store, the cheaper stuff seems to work perfectly fine). They do make life easier, so if you have the money for it and want the convenience, go for it, but I only think you really need them if you're specifically trying to maintain a specific pastel color from the start (which you could mix together with color and conditioner too, but it would probably be difficult to keep it the exact same color throughout). Brighter colors like I prefer are touched up perfectly well with home-mixed color and conditioner. My hair changes shades over time with different touch ups, and I'm fine with that.
I also suggest avoiding heat styling as much as possible to keep your hair healthy. I only use a hair dryer or a curling iron on my hair maybe once every two months or so, for special occasions only.
Credits:
When I do get my hair done professionally, I go to Ruby Devine at the LABoratory in Alexandria, Virginia.
I learned a LOT about hair bleaching and coloring from the Dainty Squid’s master hair posts on the subject, although I’ve added a few things and adjusted others to fit my specific needs.

For your entertainment: guest cat Martok is a total hair goblin and loves burying his face in it no matter what color it is. 🙂